Wednesday 10 April 2013

WE DID IT!

Today at 10am our final render completed for our animation! We threw it onto my laptop and hurried into the hallway to watch it in secret as a group before presenting it to the class later today. Last night we thought we would leave the lab before midnight but due to some difficulties we came to realize that we would be here all night. Surprisingly the computers cooperated well last night and we could fix a lot of the bugs we had.

The soundtrack for the animation is now complete along with the sound effects. All of the sound effects were done with recording foley sounds and manipulating them in Cubase 5.

The website can now be seen at www.UprootedShort.com. It is newly updated with character, team and about pages. It also links to our various contact/social media pages, these include:

Vimeo: www.vimeo.com/FuzzBuzzStudios
Facebook: www.facebook.com/uprootedFilm
Email: fuzzbuzzStudios@gmail.com

Now... what you have been all waiting for.. our animation!


We hope you enjoyed following us on this journey to completing this project! In the future we are hoping to submit this animation to various animation festivals!

Saturday 6 April 2013

Home Stretch

With only four days left until our short film is to be presented, the finish line is finally in sight. Our new environment proved to be exactly what we needed: our render times have dropped down drastically and now fit within our limits, and the environment itself has come together as a cohesive whole.

With every portion of our animation either rendered or currently rendering, we are taking this opportunity to work with completed renders in After Effects. As mentioned earlier in our process, we could not simply render out a sequence of frames and then place each frame together in a sequence; each frame of our completed animation consists of many "plates" which contain individual partitions of the final frame, separated at render time and then re-assembled in a stage known as "compositing".

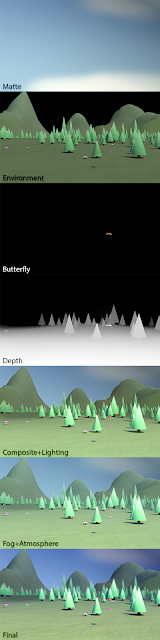
To begin compositing our animation, there are many steps that must be taken. Some of these were taken as early as setting up the renders, requiring us to render out depth passes of our plates alongside the actual image. These depth passes use a range of values from 0-255 to indicate the distance between surfaces and the camera. These values are useful for determining whether an object is in front of or behind another object, as well as establishing depth-of-field effects such as lens blur. We used depth maps extensively to aid in the construction of our scenes.

From here, we can begin editing the components themselves, and enhancing the scene overall. Because each component is contained within a plate, we can modify the footage for that component separately from the rest, or we can apply adjustments to the entire scene. Most of our time at this stage is spent adjusting the lighting.

Another step taken at the rendering stage to aid in compositing was the preparation of a fog plate. This is a sequence which captures the output of a volumetric shader applied to our entire environment set to move and behave much like fog would. This plate is used to give the scene more atmospheric colour and give depth to the environment.

From this stage, a few final adjustments are made and the scene is rendered out of After Effects to be used in the final product. Initial compositing work goes fairly slow, as it takes time to find which adjustments need to be made and in what order they should be made, but once we get one scene looking just right, we simply need to apply the same techniques throughout our animation.

Thursday 4 April 2013

A New Turn

If you had read our previous post you may have come across the idea that we were running into a lot of rendering issues. If you hadn't read that post, we were running into a lot of rendering issues. Last night at around 3am as we were setting up renders in the lab, we came to the conclusion that there was no possible way that our project would be done rendering, composited and edited by the Gold Stage (Wednesday, April 10th). The thing that was setting us back so much was the environment. So, we basically deleted all of our environment - less than a week before it was due. There is no more grass, no more leafy trees that sway in the wind, no more Herbil modifiers, and basically no more paint effects. All we had left was the matte, mountains and some random plants and rocks that were modelled. Within 4 hours we recreated our environment with conical pine trees and a grass green plane for a ground. This generated a more cartoony style and thus the matte painting we had previously did not make sense. After doing a quick matte in photoshop of just clouds the new environment was a go! We implemented it into scenes and began rendering at 9am.

We are confident that this approach will improve our project for several aspects. Such as in having a consistent cartooney style and a project size that we can better manage. Although we lost about 3 weeks of environment work, this process is for learning and so we now know not to cover a whole environment in paint effects (then convert them to polygons to be able to render in Mental Ray although they are meant to be rendered in Maya Software).

Over the past few weeks we have learned what not to do with renders... Not sure yet what all the right settings are for rendering but we are getting there! It is now 4pm and we almost have a full scene rendered which beats a week of straight rendering and having one scene close to being fully complete. I think this was a step in the right direction, and we are all feeling very optimistic about these renders :)