Once Alpha was done we pulled an all nighter to get to the rendering phase once again for our final stage! We fixed up our animation and added some more environment elements. As today is a statuary holiday we have spent it in the labs taking up every computer we can to render. Literally every computer we can: we just hit the maximum available Maya licenses for the school. So now we are waiting for the smaller files to stop rendering so that we can begin in new ones right away.
As we don't really know how to render properly we are taking a risk in the way we are doing it. Since our files are way too large and complex to render on their own anymore, we've separated each one into different layers to render individually. For instance, the grass in Scene 1 will not render as a single field, it is broken down into 10 smaller patches. We have looked into different methods to do grass but found that it would be a bigger toll to redo it than to continue on with what we have and hope for the best.
In order to render the different components separately, we couldn't just break them apart. Each of the 10 layers of grass that is rendering needs to also have shadows being cast from all the different environment objects and characters. To do this, every object is present in the scene, but we have set it so that only the ones we need to be shown for the current pass is shown, with the rest being rendered as invisible shadow-casting objects.
To speed up our renders as much as possible, we are skimping a bit on flexibility. When rendering, each frame comes out as a set of "passes", which contain all of the information from a certain aspect of the master render, such as shadows, highlights, or even more complex data like motion vectors and relative-camera depth. The more render passes you produce, the more control you have over the components of your scene, but each render pass added takes up additional time and space per computer. To minimize the time spent rendering, we chose to only render out the passes we think are necessary in each scene, often using only the master and a depth pass to help in compositing them together.
In addition to all of our characters and environment objects, we are also rendering out a layer of coloured fog with each scene. To avoid getting too wrapped up in the details and complexities of volume shaders, particulates, and noise generation, this fog has to be rendered using a completely different renderer (Maya Software as opposed to Mental Ray). To make our fog, we simply created a large cube around the entire environment and attached it to a a Maya volume. After playing around with some settings and colours, we achieved something which gave a fairly realistic distribution. This fog layer will be useful when compositing, because we can use it to give the environment a much greater sense of depth and occlusion.
Friday, 29 March 2013
Wednesday, 20 March 2013
Particle Systems
For the Alpha/Previs, I had created a basic particle setup which utilized two emitters, one for dust, and one for dirt particles. This is for the scene where the tree is ripped from the ground. Today, I spent the entire day improving the setup to enhance the look of the scenes and make sure that the tree being ripped out looks like it has force behind it, and will look awesome.
I started off by adding more instances of dirt particles, and creating a new rock/dirt texture for them. I then went in and spent a lot of time tweaking the amount of particles, the area of effect, and colors and transparencies so that everything would act the way we want it to.
Then I moved onto the ground. If a tree is being ripped from the Earth, you would expect the ground to be pulled up with the tree, so I create an additional plane just underneath the ground. I shattered it to create broken pieces, and then animated the pieces to rotate towards the tree and pull upwards out of the ground as the tree lifts.
Through a combination of the two, the scenes have gained a lot of value, showing the strength of Behemoth as he rips out the tree from the ground.
Here is a before and after comparison to get an idea of what was created today.
 |
| Before- a flat shot, showing the roots pulling out |
 |
| After - dust, debris, ground breaks round out the shot |
Monday, 18 March 2013
Previs Update
This week we rendered out all of our scenes with basic features, in order to test our timings, errors, glitches and so forth, and to show that all of our features are under way. Now that we have a good idea of all the fixes and changes we need to implement, we are hard at work at doing so. Keep in mind, this video is a work in progress and is an alpha render, so there are many features not included in order to save on render times.
The overall animation is coming together, but we are working on improving render times, getting in all of our main and extra features, cleaning up the animation and timings, and making sure it looks as clean and solid as possible.
The overall animation is coming together, but we are working on improving render times, getting in all of our main and extra features, cleaning up the animation and timings, and making sure it looks as clean and solid as possible.
 |
| A scene render with grass |
Sunday, 10 March 2013
The Waiting Game
This week we have completed all of the animation for our film. We split up the scenes and all powered through to get it completed, as we have our Alpha due this upcoming week. The alpha will show all of our animation, but an unpolished version. Some environment models will be basic, and we will not include every detail as to save on render times for this week. We are showing that we have been able to get through all the major challenges of our animation and have made it to the final stretch after a lot of hard work. There is still plenty of work to be done, as we are collecting a lot of information on lighting, rendering, and compositing techniques as to speed up our render times and produce the most polished product that we possibly can. As for now, we wait as our Alpha renders out, and are beginning the home run towards our Beta and Gold milestones.
Sunday, 3 March 2013
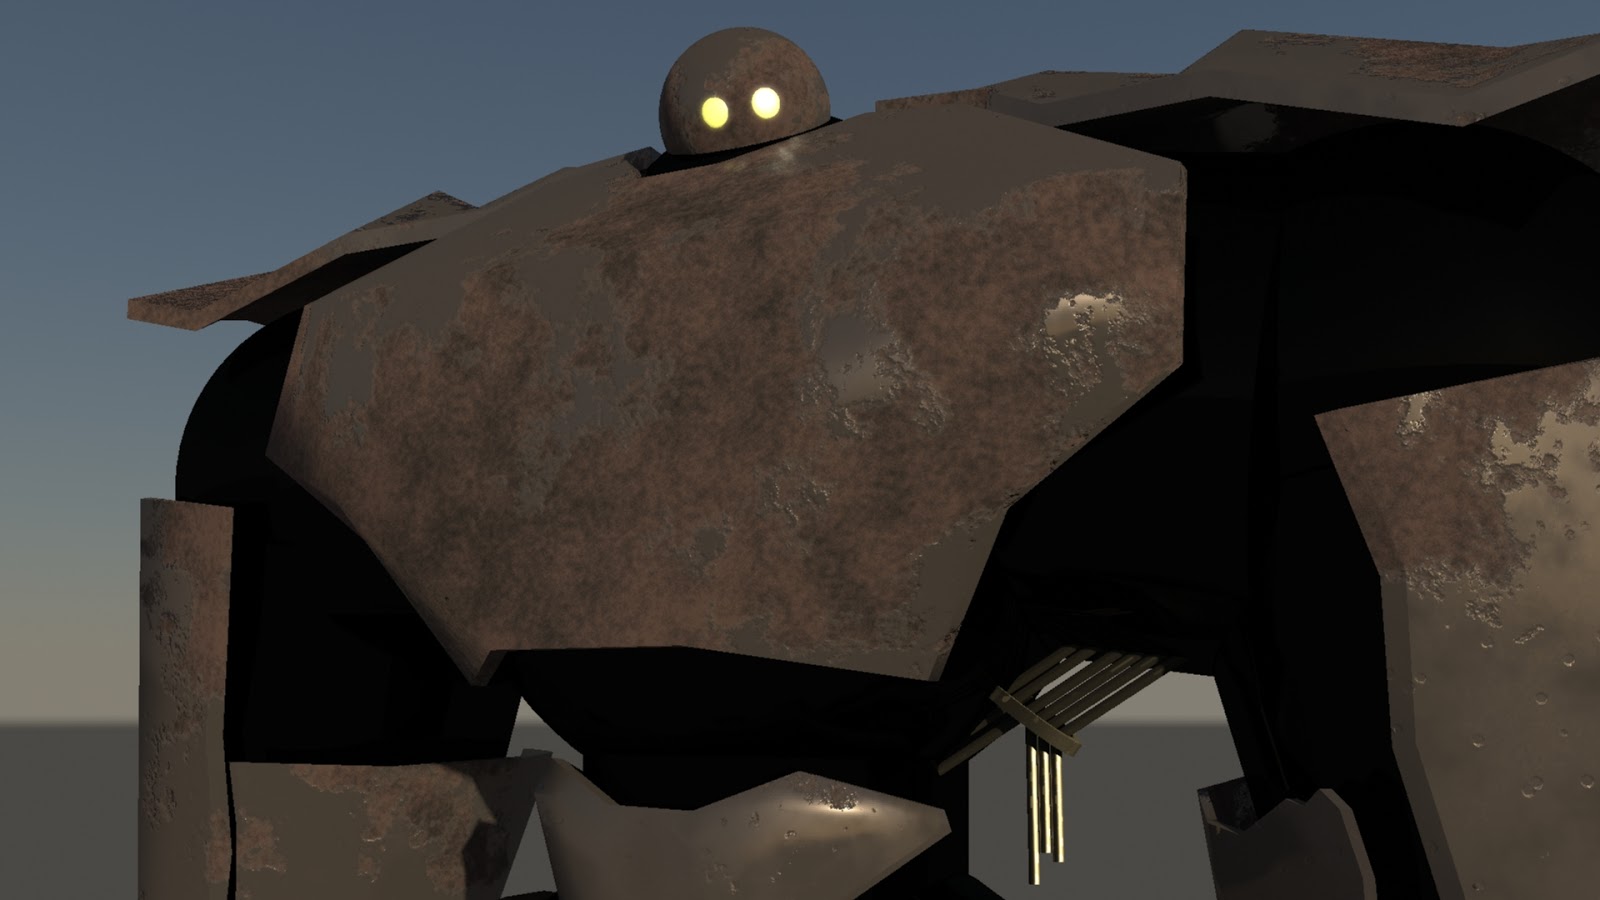
Behemoth Lives
Through plenty of tests, changes, and just flat out fails, Behemoth is alive. This guy went through a lot of trials, and changed a lot along the way. Originally, I had made a basic model in ZBrush and used that during the Prototype in order to do some animation tests. I wasn't sure how I was going to go about creating the model, and there seemed like a few solid options. The first test I tried was to go along the entire basic model and extrude out polygons from it in order to create the armour. It seemed like it would turn out alright, but in the end with the way I had approached it, it really just looked flat out awful and I knew it wasn't going to be something I could be happy with. Then, I had the idea of trying to create the model in ZBrush. I wanted to get more familiar with the program anyway, so it seemed like a strong idea. However, every time I tried to bring the model in to Maya, it was just way lower resolution than I expected, and I just couldn't figure out how to get some weird changes it was experiencing under control. Not to mention that it was porting over in millions of polygons, which was definitely not ideal. Although I was frustrated with the process, I just moved on to my next option.
I began modelling each individual piece of armour in Maya, and then placing it around the base model, making sure to fit each piece so it would fit properly and would not interrupt anything when being moved around and animated. When I was happy with the pieces, I moved onto the textures. After trying plenty of different styles for the armour texture, I found one that I was fairly happy with. It gave the right reflection and looked good. However, it didn't 'wow' me, and I kept trying. I found a basic rust texture on-line, and although it didn't look great, it definitely had a cool feel to it. I edited it heavily, and then figured out how to merge it with the previous texture I had created, in order to get the current texture.
Then I began on the dynamic wires. I wanted to create something that would hang and react to its surroundings as we animated it. At first, we attempted to create the wires using hair (as we had created the tongue for Herbil), however, after playing with it for a while, I was just really not taking a liking to it. It did not take on textures well, and was not easily manipulated to look how I wanted it. I decided to try and change it up in order to match the concept more. I created nCloth wires, and placed them around the body, making sure that as the robot moves in animation that the wires were reacting properly (bouncing off the body and so forth)... and they worked! I edited the old texture I had created for the robot slightly, placed it on the wires, and it managed to work well with the rest of the model.
I finished up the model by manipulating the armour in various places to break up the symmetry and look old and decaying in order to match the textures. The UV maps were smoothed out and made sure they were all functioning properly. I also spent some times trying to create some sparks which would shoot out of the end of the wires, but I decided it was taking longer than we wanted it to, so I scrapped it, and if we get time in Post, we can look at adding it in a different way.

The image above shows some of the rig controls for the robot. His rig makes sure that he will be able to do everything he needs to for our animation, with the ability to move his knees, feet, legs, arms, wrists, fingers, neck, and so on. His rig updated as the model did, and was done with parenting (linking the body parts together instead of weighting certain areas) in order to get the proper blocky robot movement needed.
 |
| Behemoth (by Colin Grey) |
 |
| Concept reference |
 |
I finished up the model by manipulating the armour in various places to break up the symmetry and look old and decaying in order to match the textures. The UV maps were smoothed out and made sure they were all functioning properly. I also spent some times trying to create some sparks which would shoot out of the end of the wires, but I decided it was taking longer than we wanted it to, so I scrapped it, and if we get time in Post, we can look at adding it in a different way.

The image above shows some of the rig controls for the robot. His rig makes sure that he will be able to do everything he needs to for our animation, with the ability to move his knees, feet, legs, arms, wrists, fingers, neck, and so on. His rig updated as the model did, and was done with parenting (linking the body parts together instead of weighting certain areas) in order to get the proper blocky robot movement needed.
Subscribe to:
Posts (Atom)