Wednesday 27 February 2013

Scared Herbil

Due to the variety of motion we included in our storyboard, we knew that it would be nearly impossible to create a single 3D model which allowed us to animate Herbil. Certain aspects of the character such as the detachable arms and flailing tongue were radically different from his original state, and so we planned our first model in a way that would let us modify it halfway through.

Once we had finished the cute model, the first step in creating the scared model was to separate the arms from his body. We then smoothed the resulting holes in the mesh down to small points which could later be attached by tubes. The majority of the work that went into modifying the model went into these arm-tubes. We knew that manually animating the flailing motion of Herbil's arms would be a very tedious and difficult process, and so we used Maya's dynamics system to simulate the motion for us. In order to achieve the effect we wanted, we used Maya's nHair system to create dynamic curves and attached cylinders to the control points on each curve. This made the cylinders twist and deform according to the curve, making the animation that much simpler for us!


A similar method was used to create the tongue, although in this case, the tongue is actually just a single hair sticking out of the center of Herbil's mouth. It's a bit strange when you think about it, but the simplest solutions are often the best.


As a result, we now have a completed cute Herbil model, as well as a completed scared Herbil model!


Herbil Update

It's been awhile since we've revealed our progress on Herbil, but rest assured, he's been receiving a steady stream of updates while we've been explaining the butterfly and environment process. As we get closer and closer to our Alpha milestone (March 15th), the final product of our animation should start to take shape, and we hope to reveal that shape through the next few updates.
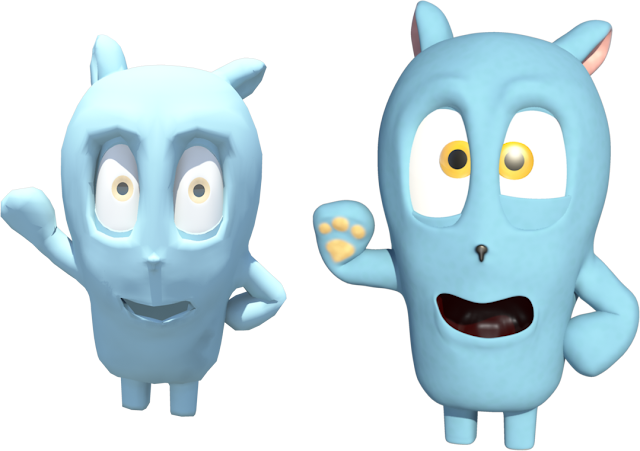
Left: Prototype Herbil
Right: Alpha Herbil
The first and most noticeable of Herbil's updates is that his character model is now complete. After applying some finishing touches, sculpting an interior to his mouth, and re-modeling his eyes, we increased the divisions on his mesh to make it smooth and give us as much control as possible.

Once we had reached this step, we created Herbil's control rig. The basics of this rig were essentially the same as rigs made previously throughout the project, however, the cute character is our most expressive character, and thus has the most complex control rig. Although the skeletal controls for the character have remained the same, we now needed to give ourselves a method of controlling the facial expressions of the character, as well as re-think our method of controlling the eyes in a way which no longer exploited the simplicity of earlier models. The GUI we created to animate these facial movements is by far the most in-depth set of controllers we have attempted.
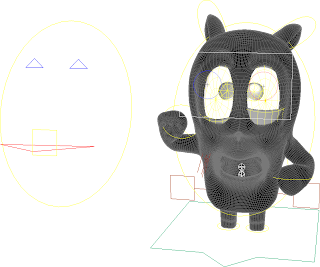
Herbil's Control Rig
It may not look like much, but this GUI gives us all the functionality we need, and masks hours upon hours of work. A few of the controls seem fairly intuitive, whereas others are more complex than they look.
  • The four thin rectangles control the individual eyelids, and function by rotating deformed spheres around the eyeballs.
  • The rectangle and circles in front of Herbil's face control the direction of his vision, and function by manipulating the geometry of the eye such that a small disc composing the pupil and iris is rotated and translated about the surface normal of the eyeball without detaching from the eye or rotating the eyes as a whole.
  • The two triangles at the top control the eyebrows, and function through a slightly more complex animation technique named "blendshapes", which will be explained in more detail below. The eyebrow controls allow us to raise and lower Herbil's brows, as well as deform them to give the brow an angled look. 
  • The perpendicular square and triangle control Herbil's mouth. The triangle simply controls the orientation of the jawbone in the skeleton, and the square controls a variety of blendshapes.
The majority of these controls were created by linking the relative position of GUI elements to the various attributes of Herbil's mesh and blend nodes through mathematical expressions.

Facial Expressions
This GUI would be practically useless, however, without the use of blendshapes. To add blendshapes nodes to our model, we simply duplicate our original mesh, mold it into the shape we want, and create a deformer between the two. This creates a simple slider control which can be used to alter the percentage of deformation. By linking this control to a GUI element, we can easily pose our model at any interpolated position between our original shape and our blendshape.

The concept behind creating blendshapes is actually pretty simple, but in order for them to be used effectively, many different shapes are needed, with careful attention being paid to the sculpting process of each.
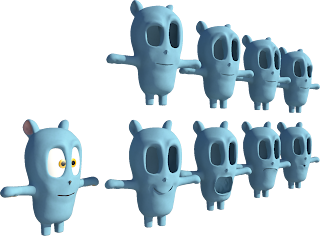
Blendshapes
As you can probably tell from the above images, we have also begun applying materials and textures to the different areas of Herbil's body. His skin is covered in a soft leathery material to give it the look of cartoon animal hide, and his paws and ears have been given different colours. The inside of his mouth is given a wet, organic look by using Maya's ocean material. His eyes are given shiny, reflective materials in order to make them appear expressive. The reflections on his eyes were particularly complex, as simply increasing their reflectivity makes the entire eye act like a mirror. In order to avoid this, we researched different techniques for creating realistic eye reflections, and discovered that many 3D software materials include a shader for "Fresnel falloff", which causes light rays to reflect based on the difference between the angle of the surface and the angle of the camera. Unfortunately, we could not find a pre-built Fresnel falloff solution in Maya, and so we had to create our own and link it to the reflectivity of Herbil's eyes.

Material Close-Ups
You may have noticed that, at this point, Herbil is completely bald. The original concept for Herbil described him as being covered in soft blue fur, but through the process of developing the character, we decided against fur in the final design. In addition to aesthetic reasons (we quite like the new bald Herbil), there were many technical difficulties that came with using fur. After spending many hours attempting different techniques and technologies for achieving the intended fur effect, it was determined that each of the possible solutions resulted in one or more major drawbacks. Although we ended up losing time in our efforts to create fur, any further time that would have been wasted trying to fix a fundamentally flawed implementation can now be used on other aspects of the film.

And so, after all our hard work, the cute Herbil is finally ready for animation!
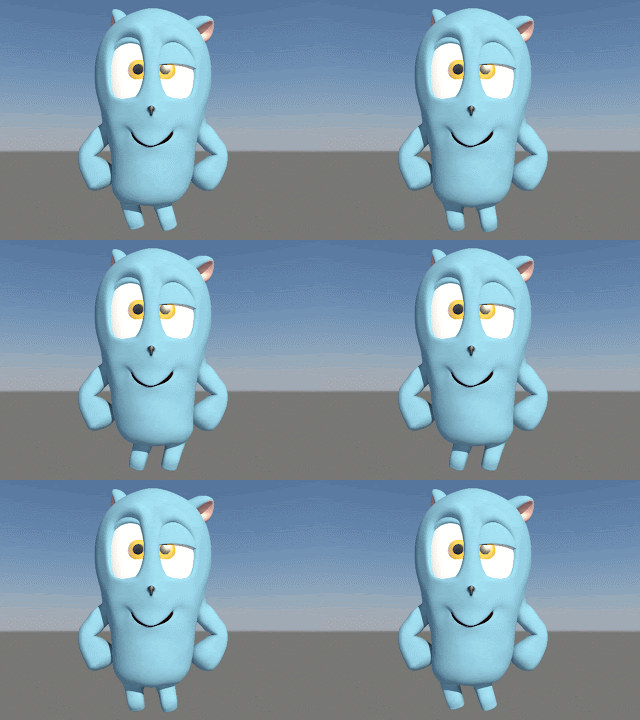
Shmeeh!

Saturday 23 February 2013

Further Environment Planning

When we started working on the project, we all had a general idea what the environment looked like: we wanted it to be a mystical forest; a place for Herbil to live. However, we never discussed exact details such as tree aesthetics. Are they normal maple or oak trees or are they Wonderland-style curvy mushrooms? In doing some tests and looking at references, we knew that the most important part of making a forest look mystical was by playing with the lighting. As well, it's not always the look of the trees, but the forest ground that gives it a mystical ambiance. Unfortunately for our project, we do not have time to play with the environment too much. Thus, the land is going to be comprised of mainly grass and some flowers in distinct locations.

Below is a quickly drawn out map of where the characters are going to move within the sample environment. We had to plan out the landscape and decide where hills, tree clearings, characters, and the sun will be placed. The sun is located on the bottom left of this bird's-eye-view, and the robot will have his back to the sun for the intimidation shots. This way the light will not light up his face until the end scene when the tree crashes. The main clearing in the forest is a flatter area because we want Herbil and the robot to be on an even plane to show a proper comparison between Herbil and Behemoth's size.When Herbil feels scared by the tree the land will be uneven to parallel how he is feeling.


We have named our main tree that gets thrown the 'mystical tree' for simple reference (on the map it is the purple circle). This tree will be placed on a hill with flowers near the base. To create this tree we took a paint effects tree without its leaves and played with the settings to get the base shape of a trunk, branches and twigs. To add on the long strands we painted blond curly hair onto the object's tips, then created a preset to be applied to each strand. This preset converted each strand of short curly blond hair to a long straight strand. A material was then applied to all of the strands to give them a uniform colour pattern. To make each strand move when the tree gets thrown, we added spring dynamics to the paint effect we used.
Tree with default paint effects brush on tips mixed with sample strands.


Completed Mystic Tree Sample 1

Wednesday 20 February 2013

Mid Sprint Update

We are now well into the production phase of our project. We have three models completed or nearly completed (scared Herbil, normal Herbil and the butterfly) and a fourth on its way (Behemoth). Currently I am working on creating the environment for where the story will take place. We really want mystical trees and have the idea of a fairy tale world to where this story takes place and trying to make the environment match the idea is really fun! I am finding that using the Maya paint tools are both useful and entertaining. There are so many options. For instance, we can create a field of hands within seconds. Once you have a field of hands you can change the materials/textures of all of them or individual ones. Thus you can have a field of polka-dotted purple and yellow hands within a few minutes (depending if Maya crashes or not ;D ).

As we continue to encounter difficulties with our project, we are attempting to adapt to each situation as they arise. Right now Sean is working on re-painting the weights on scared Herbil because the way we decided on doing the arms involved editing the mesh of Herbil, and Colin is currently working on the robot.

Monday 18 February 2013

Butterfly Wings

Yesterday we continued work on finalizing our character models, but we also found time to illustrate a detailed texture for the butterfly wings. As can be seen in the video below, the wings now have areas of transparency, which was accomplished by modifying the alpha mask on the original texture to give it softer edges and a duller interior.


Saturday 16 February 2013

Butterfly Update

Once Tegan had finished modeling the body of the butterfly, we could move on to the next step in preparing the character for animation: rigging. Like our cute character, the butterfly character's rigging process involves weight-painted skeletal controls, as well as custom GUI controls. In this case, luckily, the control rig was much simpler in concept and proved to be easier to create.

In terms of skeletal controls, all that needed to be done for the butterfly was create bones for each of the legs, and then spend about an hour painting the weights for those bones. We determined early on with our prototype butterfly that the majority of the insect's motion would not be skeleton-based, and we would save time in animation later on by coming up with alternatives.

To give the butterfly the ability to bend its body, we chose to use a non-linear bend deformer. This gave us a natural range of motion, as well as allowed the entire body bend to be controlled with one element. The butterfly's antennae were given the same treatment. The wings of the butterfly were more complex, and required multiple varieties of deformers in order to achieve the flapping motion we wanted, but as we had solved this problem with our earlier model, we simply needed to reproduce the functionality we had created for our prototype butterfly.


In addition to rigging, completing the butterfly model gave us the chance to develop some basic materials for the character. For now, the butterfly wings have been given a limited texture to inform their shape, and we have experimented with different bump-mapping techniques in order to give the flat wings the impression of depth as they move through the air. We have also applied some basic materials to the butterfly's body and eyes to give it a more iridescent look.

Early Butterfly Material Tests
 Although the butterfly has a limited amount of screen-time planned for our short film, the character's involvement is just as important as Herbil or Behemoth, and with the completion of its control rig, we now have our first character fully prepared for animation!


Thursday 14 February 2013

Butterfly Body Modeling

As you previously saw we have figured out a way of how to rig the butterfly in a way that made sense to the wings moving. Now we just needed to actually make a butterfly to fit that render to. Over the last couple of days we have been working on a body of the butterfly. Using reference images from Google images proved useful as we have never seen a butterfly in macro view before.

Butterflies are a lot more 'buggy' then you may perceive. They have six legs long bendy legs, with 3 different parts to their body and massive eyes that encompass most of their head area. Their legs all come out of one area, which you would think be very unbalancing but they stay standing. Neat fact, butterflies taste with their feet!


Wednesday 13 February 2013

[model] Paint FX Tree

Maya tree FX model (Colin)
Using the Maya paint FX tool, we are able to create some fairly good looking trees. It needs tweaking on the amount of branch divisions it goes through, but since the environment is a 'mystical/magic' forest, having trees that have a non-standard look to them will work well for us. I added a glow to the tree and am currently testing the use of wind animation on the leaves. Paint FX turbulence seems to be the best choice for this, so I'm exploring it and going to see if we can get the results we desire.

Sunday 10 February 2013

Prototype Update

On Friday our Prototype was due. At this stage in the project we must be able to display to the client that we have the skills necessary to produce a 3D animation within the time span. To show this we completed several different tasks and placed them all into one final video to present to the client.
We showed that we can create:
  • Models (making all the models you see from scratch)
  • Animations (several different short animations and run/walk loops)
  • Dynamics (noodle arms of Herbil when he is scared)
  • MEL scripts (to generate the environment)
  • Particles (forest spores)
  • Materials (to show that we have a basic understand of materials and how they are applied)
Below is the video we submitted as our prototype. Enjoy!


Butterfly Prototype

Originally, we were pessimistic about the amount of work required to create the butterfly character for our animation. The wings in particular would be incredibly detailed, and with the appearance of the wings being important, the texturing, materials, and UV mapping would be very complex. The wing animation was also considered to be a problem, as we could not simply rotate the wings and attaching the mesh to a skeleton through weight-painting would be tedious and difficult. Luckily, we managed to come up with solutions for both of these problems within a few hours of work, and an early butterfly model was made this morning as practice for the final.


In order to avoid modeling detailed butterfly wings, we simply created a planar surface and applied a texture with an alpha mask to the material. This prevented any UV mapping work on the wings, as the texture can be applied to a uniform set of polygons, and the alpha mask gave the plane the appearance of being shaped to match the wing texture.

To animate the wings, we applied a set of twist and bend deformers to the planar surface and created a custom GUI. By creating a relationship between the relative position of a GUI element and the various attributes of the deformers, we developed a simple interface which allows us to control the flapping of the wings. The deformers save us an enormous amount of time in rigging effort, and the GUI will save us time in animating the final butterfly.

Prototype Butterfly Control Rig

Saturday 9 February 2013

First walking animation [robot]


This is the base model of the robot I've used for testing. I had some challenges with the rigging portion and figuring out how to make him move like ... well ... a robot. A lot of the set-ups in testing were causing him to have deformations, but by changing the weighting and parenting the separate pieces on to the joints, he is working pretty well! This is a loop of a test walking animation for the robot. There were rigging tests I did, such as putting a foot roll on the model (like a human would have), but because of the structure of him, it doesn't make a whole lot of sense. The whole idea is that he is big, bulky, metal, and is going to walk slow and heavy.

Friday 8 February 2013

Pre-Prototype Update #1

Recently we put our first model to the test! Sean added a basic rig to Herbil and then we went to practicing animation. We had a lot of fun when it came to this, making Herbil move in funny poses and added silly materials onto him. It was a great way to explore the different animation elements of Maya without the pressure of making it completely perfect for our final product. The only difference between the final model and the one you see below is that the final will have an interior to go with the mouth, more detailed features, and added textures.

I have nearly finished Herbil's model, just perfecting the inside of his mouth and tongue. As well, I have played around with quick fur textures and a very simple jump animation. Sean played around with different material settings and attempted a looping run animation which we hope to have polished and ready to present as part of our prototype later today.


Wednesday 6 February 2013

Super Awesome Flowlines #1

When it came time to model Herbil's mouth we realized that the model had not been set up for proper flow lines. Flow lines are the curves of the mesh which map to the flow of distortion due to animation.When modeling a mouth it is important to have proper flow so that the shape of the model is correct. as well as  to prevent strange motions when animating the facial expressions. On a face, flow lines have to go around important features such as the mouth and eyes. Before shaping the mesh to fit to this method, the body of Herbil was very boxy and inorganic. When viewing the picture below, pay close attention to the lines around his mouth, arms and eyes.

This was the first model that I have worked on and the first time implementing flow lines into a model. I used reference images found online to understand the shapes around the mouth crease and where the flow lines come from (such as the lines going from the nose around his chin). The next step is to model the interior of his mouth and then rig 'em good!

Tuesday 5 February 2013

Post-Pitch Update

Hello!
Sorry for the inconsistent updates; we have been busy with school work.

The pitch to the class was last Friday (Feb. 2, 2013) and it went well! The goal of the pitch is to sell your idea to the class. Proving to them that this is an innovative project and everyone in the group is a suitable member who can offer something unique to the project.We set up a slide show to display our poster and played the animatic to the 'clients' (the class and professor). Originally, instead of an animatic, we were just going to display our storyboard and click through each image. We created a full animatic for the presentation because they are more visually appealing and have a better sense of timing versus a storyboard. The animatic was very well accepted among our peers; they especially enjoyed the cheesy sound effects that we created from recording Colin Grey's voice and manipulating them slightly. Below is the animatic that we made up for that presentation.

Currently Sean and myself (Tegan Scott) are building the 3D-model for Herbil and working on environment objects (such as trees). Colin is modeling Behemoth, the giant robot and doing particle tests for grass and flying forest spores.